Sweater weather is finally here! This also means that it’s time for beanies!
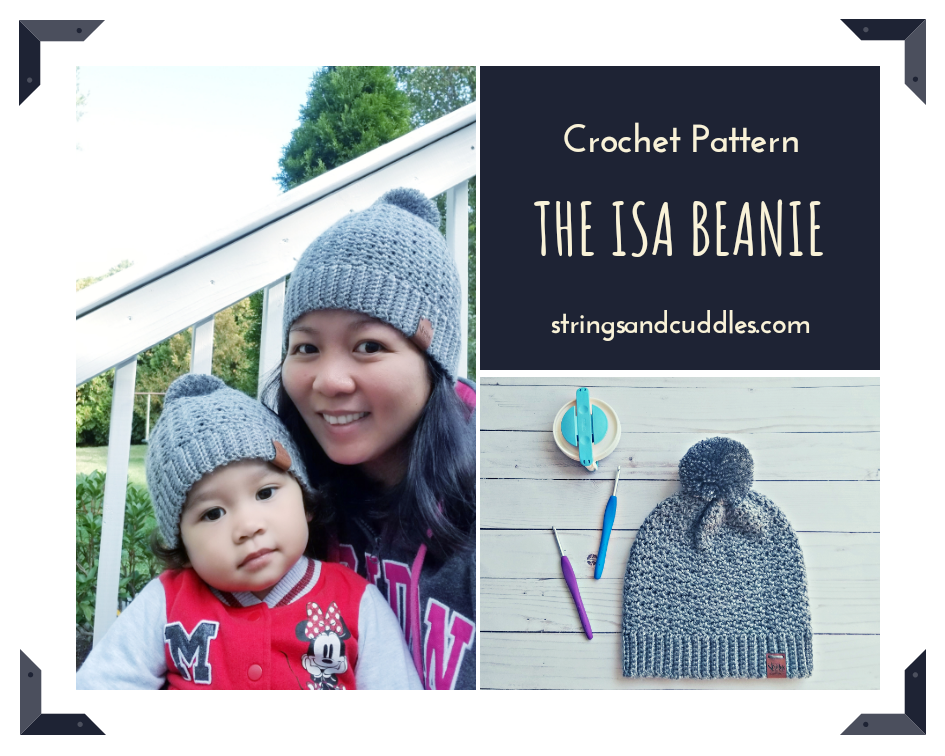
Let me introduce you to my new pattern called The Isa Beanie! You may be wondering where I got such name. I always have a hard time naming patterns, but this one came out so easily. Well, let me tell you something! Isa, in Philippine (Filipino) language means “one”. Also, Isa is my baby girl’s nickname. And, today is October 1st (one)! Did I plan it? Absolutely not! The truth is, I had planned to release this pattern last week, but instead I re-released my first pattern, The Robbie Hat. While I was writing this post, it just came to me all these coincidences. Perfect timing! When it’s time, it is time!
You can find the pdf copy of this pattern on my Ravelry shop. If you have no time to crochet just yet, please don’t forget to add it to your favorites or queue projects.
You can also pin it here!
Let’s crochet!!!
SKILL LEVEL
Advanced Beginner
MATERIALS NEEDED
Worsted Weight Yarn | Yarnspirations Caron Simply Soft in Grey Heather
Crochet Hook Sizes G (4 mm) and H (5 mm)
Scissors
Tapestry Needle
Tape Measure or Ruler
Optional: Pompom Maker (to make your pompom) or Faux Fur Pompom
STITCHES AND ABBREVIATIONS
(US TERMINOLOGY)
Ch(s) – chains
BLO – back loop only
DC – double crochet
SC – single crochet
SC2tog – single crochet 2 together (decrease)
Sk – skip
Sl – slip
Sp – space
St(s) – stitch(es)
GAUGE
21 sts x 12 rows = 4 inches (10 cm) in the pattern below.
GAUGE PATTERN
With hook H (5mm), ch 20
R1: (SC, ch 1, DC) in the 2nd ch from the hook, sk 2 chs, (SC, ch 1, DC) in the next ch, sk 2 chs, Repeat from * to * across. Turn.
R1: (SC, ch 1, DC) in the 2nd ch from the hook, sk 2 chs, (SC, ch 1, DC) in the next ch, sk 2 chs, Repeat from * to * across. Turn.
R2: Ch 1, (SC, ch 1, DC) in the ch-1-sp, sk 2 sts Repeat from * to * across up to the last ch-1-sp. (SC, ch 1, DC) in the last ch 1 sp. Turn.
R3 – R12: Repeat R2.
A LITTLE REMINDER
- I recommend to read through the entire pattern before starting and circle the numbers that apply to your size.
- This beanie is worked from bottom up.
- Pattern is written as follows: Newborn (3-6 Months, 6-12 Months, 1-3 Y/O Toddler, 3-10 Y/O Child, Teen/Small Adult, Men / Large Adult)
- Remember that the pattern for the gauge is worked in rows where you turn a ch at the end of each row while the pattern for the body of the beanie is worked in rounds.
- Starting ch 1 does not count as a stitch but ch 3 counts as 1 DC + ch 1.
- Not all heads conform to sizes by age; please measure for a more accurate fit. Please refer to the SIZES AND FINISHED DIMENSIONS table below.
- The pattern for the body of the beanie is multiple of 3.
- If you want your beanie to be slouchy, add few more rows to the body of the beanie before continuing with the shaping of the crown.
- Asterisk * indicates pattern repeats. You will need to repeat all the instructions between asterisks.
- Parentheses ( ) are used to indicate a group of stitches to be worked in the same st/sp.
- Brackets [ ] are used to indicate the number of chs, rows, sts and measurements.
SIZES AND FINISHED DIMENSIONS

PATTERN INSTRUCTIONS
BRIM
With a smaller hook (4 mm), ch 8 [8, 8, 9, 9, 10, 10]
R1: SC in the 2nd ch from the hook and in each ch across. Turn. [7, 7, 7, 8, 8, 9, 9] sts
R2: Ch 1, SC BLO in each st across. Turn. [7, 7, 7, 8, 8, 9, 9] sts
R3 – R55 [60, 65, 70, 75, 80, 85]: Repeat R2. [7, 7, 7, 8, 8, 9, 9] sts
Fold your brim by bringing R1 and the last row together then sl st across (both loops). Change hook to a larger size H (5 mm). Continue with the body of the beanie instructions.

BODY
R1: Ch 1, SC 57 [60, 66, 72, 75, 81, 87] evenly around in the edges of the brim. Sl st in the 1st SC to join. [57, 60, 66, 72, 75, 81, 87] sts
R2: Ch 1, (SC, ch 1, DC) in the 1st st from the previous, sk 2 sts, *(SC, ch 1, DC) in the next st, sk 2 sts* Repeat from * to * around. Sl st in the 1st SC to join.
R3: Sl st in the ch 1 sp from the previous round, ch 3, SC in the same ch-sp, sk 2 sts. *(DC, ch 1, SC) in the next ch 1 sp, sk 2 sts*. Repeat from * to * around. Sl st in the beginning ch 3 to join.
R4: Ch 1, (SC, ch 1, DC) in the 1st ch 1 sp from the previous round, sk 2 sts. *(SC, ch 1, DC) in the next ch 1 sp, sk 2 sts*. Repeat from * to * around. Sl st in the 1st SC to join.
Repeat R3 and R4 until your beanie measures 4.75 [5.25, 6.25, 6.75, 7.25, 7.75, 8.25] inches (this includes the brim). Continue with the shaping of the crown instructions.
SHAPING THE CROWN
R1: Ch 1, 2 SC in each ch 1 sp from the previous round. Sl st in the 1st SC to join.
R2: Ch 1, SC2tog around. Sl st in the 1st SC to join.
R3: Ch 1, SC2tog around. Sl st in the 1st SC to join.
Fasten off and cut yarn leaving 6” long tail. Thread through remaining stitches. Pull tight to cinch closed. Secure and weave in ends.
Optional: Add a pompom of your choice and it’s done!

Happy crocheting!
*** *** ***
All images and patterns are copyright of STRINGS AND CUDDLES. You may sell any items that you make from this pattern. You may NOT use my images. Please DO NOT copy, redistribute or claim as your own. If selling items from this pattern, please give credit to STRINGS AND CUDDLES by linking to my shops or on social media @stringsandcuddles.
I would love to see what you create, please use #stringsandcuddles, #stringsandcuddlesdesigns, #TheIsaBeanie to share.
Please don’t hesitate to reach out for questions regarding this pattern.

One thought on “THE ISA BEANIE”