Hi friends!
I have been missing in action but I am still here — still creating fun projects!

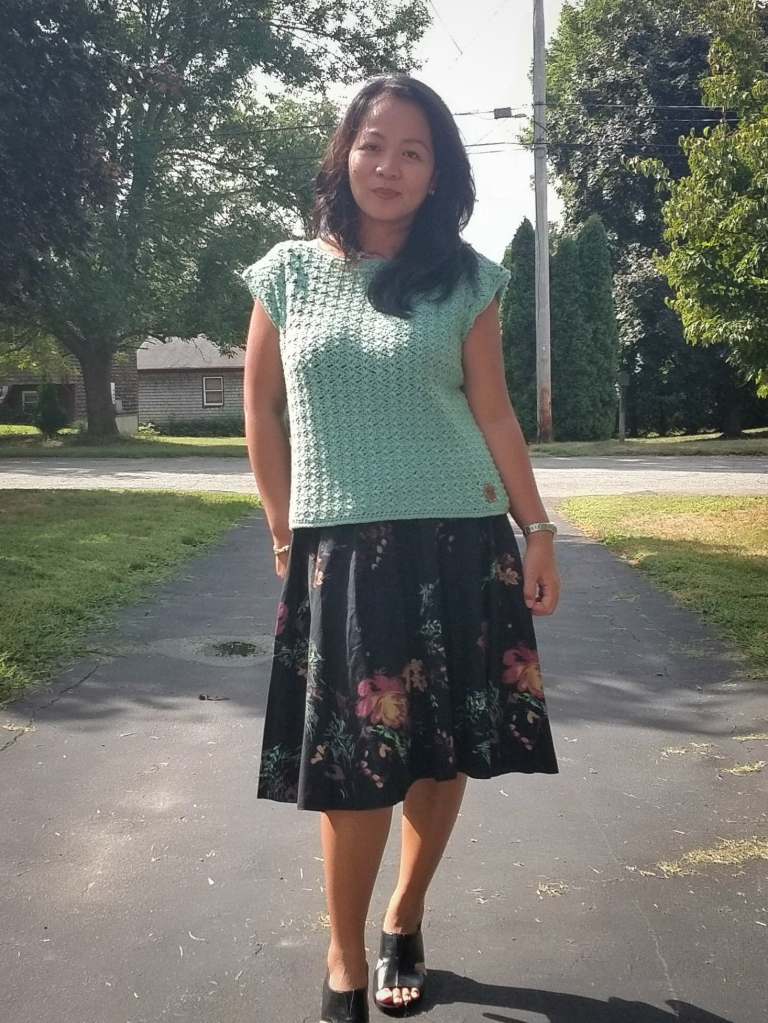
I am very excited to tell you that my pattern, the Barbara Summer Top, is featured on the SUMMER VIBES BLOG HOP hosted by Susanna from Fosbas Designs. On July 30, 2022, (at 8 am EST) you can get the Barbara Summer Top pattern as a free pdf download for 24 hours only!
Keep scrolling to find out all the details about this blog hop event.

It’s been my dream to design a crochet garment and it’s finally coming true! The process took like forever but I’m just super excited and at the same time nervous to have this pattern out in the wild!
I really had so much fun creating this pattern. As my first garment pattern, I set out to create an easy and quick project! I have used this same stitch pattern before (don’t even know the name, if there is one)! I love the textures it creates and I thought it would be nice to use for a garment pattern.
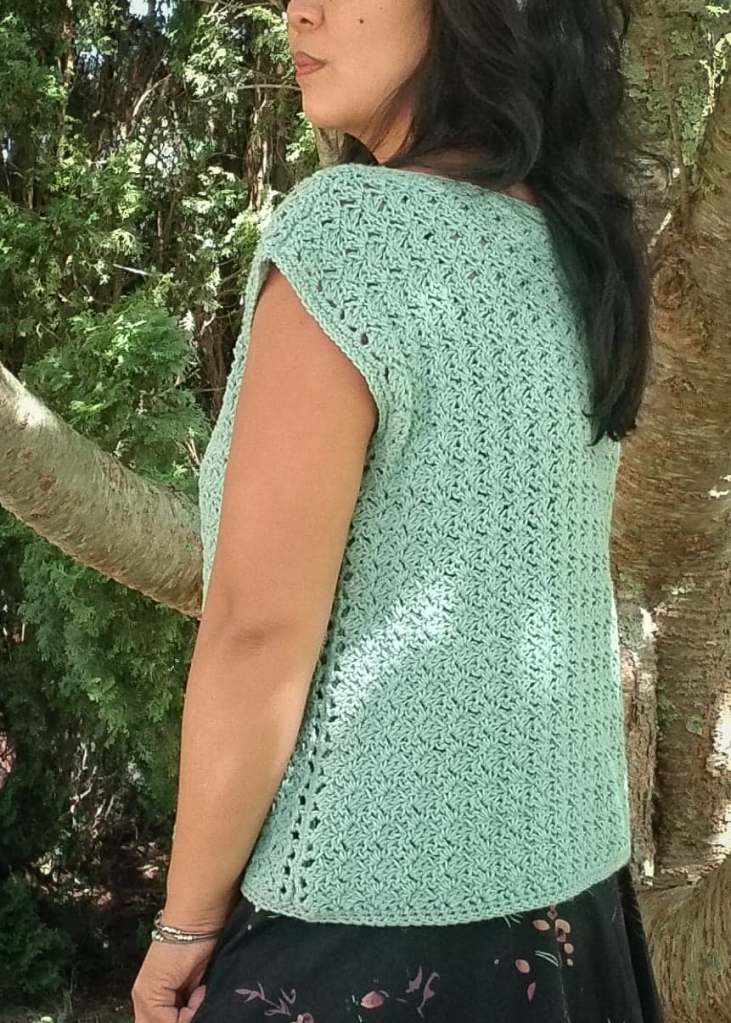
The Barbara Summer Top is a one-row repeat pattern. This boxy-type top is made with two identical panels sewn together at the end.
You might be wondering why the name Barbara. Well, Barbara (Sta. Barbara to be exact) is the name of my hometown in the Philippines. I haven’t been home for 6 years (wow 6 years, already?) and I am missing my family back home. It’s hard but this is life, right? With this pandemic, we are in right now, who knows when I can travel, go home and visit my family?

So grateful for We Crochet for providing the yarn that I used to make this top. I used their Cotlin DK Weight Yarn in Sagebrush. This yarn can also be purchased from Knit Picks. Cotlin DK Weight Yarn is beautiful with incredible shades. This cotton/linen blend yarn has a good drape which makes it perfect for summer garments. It feels great to work with and is very lightweight which produces breathable pattern designs.
This pattern features basic crochet stitches such as chain, single crochet, and double crochet. Combining these stitches together will create a nice textured pattern.

Before we dive into the pattern instructions of the Barbara Summer Top, let’s get back to the Summer Vibes Blog Hop. Keep reading!
To get your free copy of the Barbara Summer Top pattern, click the “MORE SUMMER PATTERNS” button to get the code, and then come back here and click the “DOWNLOAD HERE” button.


If you may have missed one or a few patterns during this blog hop event, do not fret because you can still grab all the 33 Amazing Summer patterns for a reasonable price of $12.99! Purchase the bundle by clicking the “BUY NOW” button.

Now, back to the Barbara Summer Top pattern!
BARBARA SUMMER TOP
This pattern is FREE but you can also purchase the inexpensive PDF file on my Ravelry shop for easy printing and reading. Purchasing the PDF file helps to support my blog and allows me to continue to share my patterns with you.
SKILL LEVEL: Advanced Beginner to Intermediate
MATERIALS
- DK Weight Yarn (#3) | Knit Picks / We Crochet Cotlin DK Weight | 675 (700, 800, 1000, 1100, 1250) yards
- Crochet Hook Size J | 6 mm (or size needed to obtain gauge)
- Tape Measure
- Tapestry Needle
- Scissors
GAUGE: 15 sts x 10 rows = 4 inches (see pattern instructions)
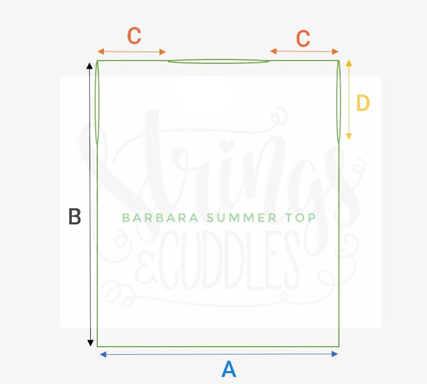
FINISHED MEASUREMENT

STITCHES AND ABBREVIATIONS | US Terminology
- Ch(s) – Chain(s)
- SC – Single Crochet
- DC – Double Crochet
- FSC – Foundation Single Crochet
- Sl – Slip
- St(s) – Stitch(es)
- Rep – Repeat
- Sk – Skip
- Sp – Space
- RS – Right Side
- WS – Wrong Side
NOTES
- Read through the entire pattern before starting.
- The beginning ch 3 counts as 1 stitch. The SC and ch 1 in the (SC, ch 1, 2 DC) pattern stitch counts as 1 stitch, meaning there are 3 stitches in the parentheses.
- This pattern is worked in 2 identical panels (front and back) which are sewn together at the end.
- This pattern is written as follows: XS (S, M, L, XL, 2XL). Stitch counts for all sizes will be in the parentheses at the end of each row. You may circle or highlight the number of stitches that correspond to the size you are making.
- To customize this pattern widthwise, adjust the foundation stitches in multiples of 3 + 1. To adjust lengthwise, add or subtract the number of rows to the measurement you want, crop or full length.
- Asterisks * * indicate repeat instructions between asterisks as many times as directed or repeat at specified locations.
- Parentheses ( ) are used to indicate a group of stitches to be worked in the same st/sp.
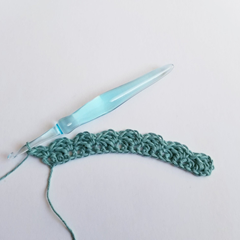
- This pattern includes a schematic diagram/chart and photo tutorials for clarity.
PATTERN INSTRUCTIONS
Make 2 identical panels

Start with FSC 61 (67, 73, 79, 85, 91)
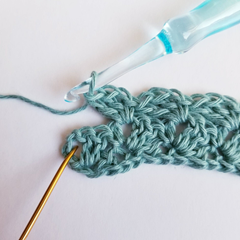
Row 1: Ch 3, 2 DC in the 1st st, *sk 2 sts, (SC, ch 1, 2 DC) in the next st*. Rep from * to * until 3 sts remain, sk 2 sts, (SC, ch 1, DC) in the last st. Turn. 62 (68, 74, 80, 86, 92)
Row 2: Ch 3, 2 DC in the ch-1-sp, *sk 3 sts, (SC, ch 1, 2 DC) in the next ch-1-sp*. Rep from * to * until 4 sts remain, sk 3 sts, (SC, ch 1, DC) in the last st. Turn. 62 (68, 74, 80, 86, 92)
Note: The last (SC, ch 1, DC) is worked around and not on top of ch 3 from the previous row.

Rep Row 2 until your panel measures 16 (17, 18, 19, 20, 21) inches.

Last Row (RS): Ch 1, SC in the 1st st, SC in the ch-1-sp, sk 1 st, *SC in the next 2 sts, SC in the ch-1-sp, sk 1 st*. Rep from * to * to end. Do not turn. 63 (69, 75, 81, 87, 93)
Do not cut yarn. We will be working 1 row of SC around the panel, from corner to corner.

First Side of the Panel – for the 1st corner of the panel, work 2 more SC in the same sp as the last st of the Last Row. Work 2 SC in each turning ch down to the 2nd corner, work 3 SC in the 2nd corner.

Second Side of the Panel (Hem – Foundation Row) – from here to the 3rd corner, work 1 SC in each st across, and work 3 SC in the 3rd corner.
Third Side of the Panel – work 2 SC in each turning ch up to the 4th corner – Last Row. Sl st in the 1st st of the Last Row. Fasten off and weave in ends.

You may block your panels first before joining them together.
Follow the diagram and the FINISHED MEASUREMENTS chart below on how to seam your panels together.

JOINING THE 2 PANELS TOGETHER
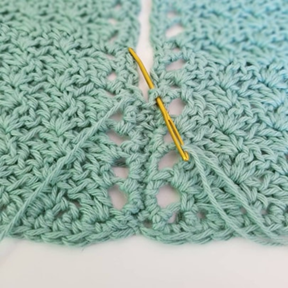
With both RS facing out, put them side by side and join one side of the two panels using mattress stitch. Rep on the other side of the top.
Do the same on the shoulder seam.

ADDING THE FINISHING TOUCHES
For a cleaner edge, we will create SC borders along the neckline, both sleeves, and at the hem.
Sleeves
Attach yarn in the armpit area, ch 1 and SC around the sleeve. Sl st in the 1st SC. Fasten off.
Neck
Attach yarn in the back center of the top, ch 1, and SC around the neck. Sl st in the 1st SC. Fasten off.
Hem
Attach yarn on either side of the top, ch 1 and SC around the hem. Sl st in the 1st SC. Fasten off.
Weave in all ends and you’re done!

Enjoy your Barbara Summer Top!
I just want to thank my amazing team of testers for all their help and support! This pattern won’t be here today without them. If you’re following me on Instagram then you have probably seen their gorgeous tops, but if not, then maybe it’s time for you to check out my page, just saying! Haha…
I hope that you like this pattern and if ever you have a question, please don’t hesitate to contact me.
Happy crocheting!
***
All images and patterns are the copyrighted property of STRINGS AND CUDDLES. You may sell any items that you make from this pattern. You may NOT use my images. Please DO NOT copy, redistribute or claim as your own. If selling items from this pattern, please give credit to STRINGS AND CUDDLES by linking to my shops or on social media @stringsandcuddles.
I would love to see what you create! Please use these hashtags to share: #stringsandcuddles, #stringsandcuddlesdesigns, #theeverydaysummerhat
Please don’t hesitate to reach out for questions regarding this pattern.
Connect with me Instagram | Pinterest | Facebook | Blog | Ravelry
***

This is a lovely top! And it looks beautiful on you. I’ve already added it to my list of favorites and look forward to making it. Thank you for sharing the pattern!
LikeLiked by 1 person
Thanks so much! Looking forward to seeing your version!
LikeLike
Beautiful!! Congratulations.
LikeLike
Beautiful top!!! Thanks for sharing the pattern!!!!
LikeLike
Thank you so much!
LikeLiked by 1 person
Thank you ever so much for this, it is lovely! I made mine a bit loose and closed the neck opening a bit further to hide my bra straps. I used left over yarn so it was cheap. I am delighted thank you
LikeLike
You’re welcome! I’m so glad you like the pattern!
LikeLike