It’s time for another pattern share!
As you all know, I love creating shawls/wraps! I may not use them that often but designing and seeing them come to life gives me that “YAY” feeling — that feeling of accomplishment! It is more satisfying when you write up the pattern, get it tested and the feedback comes back amazing!
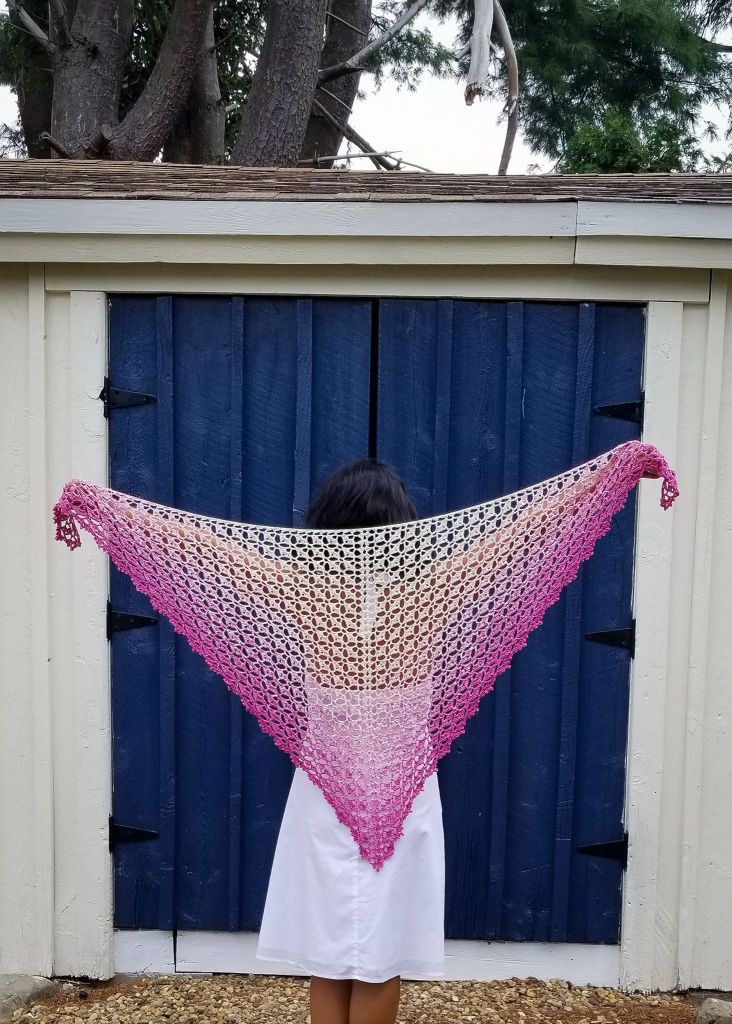
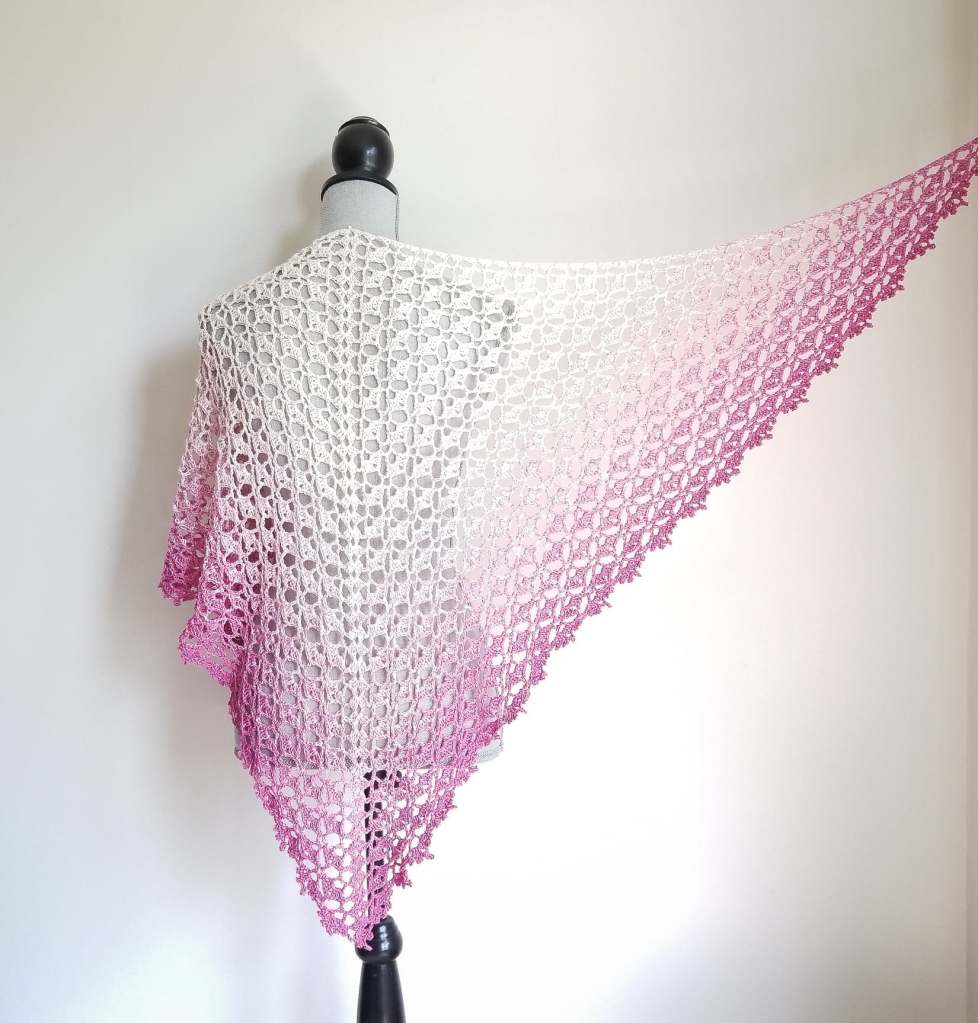
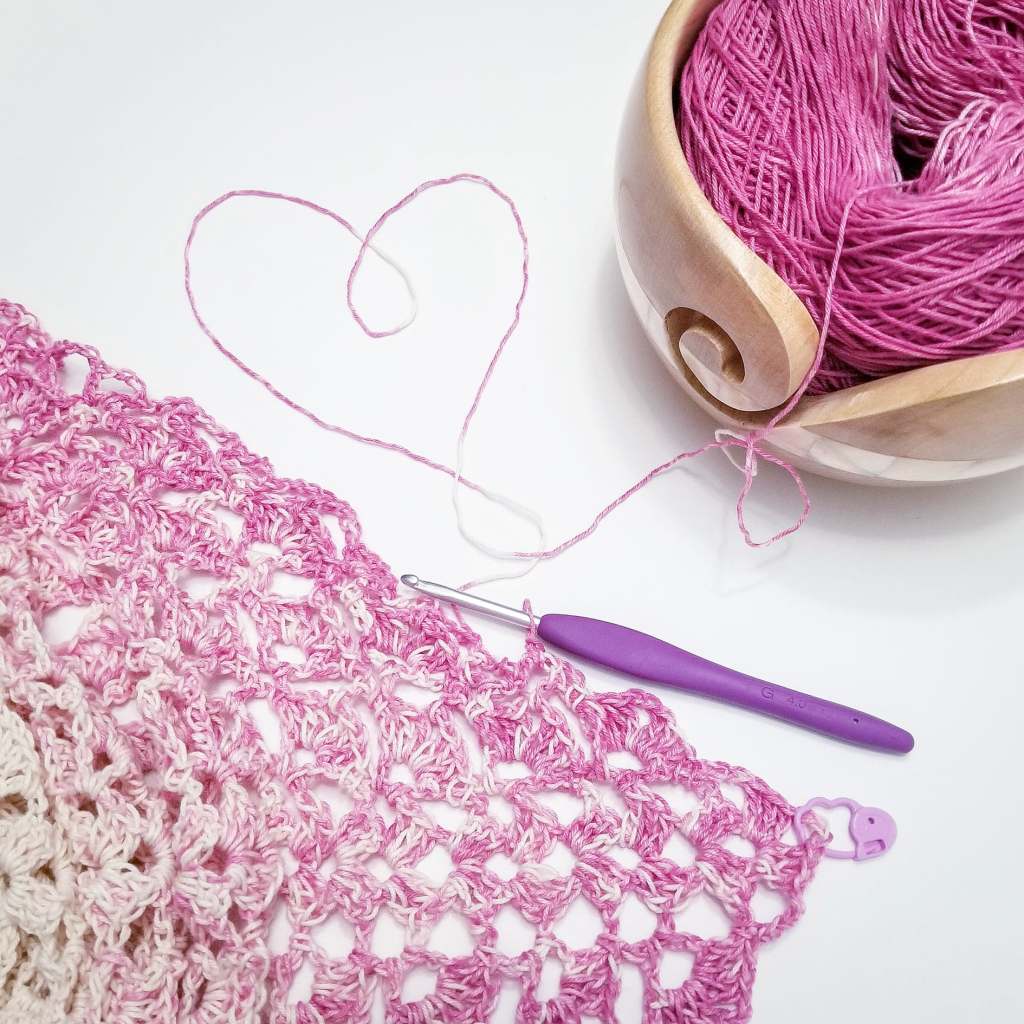
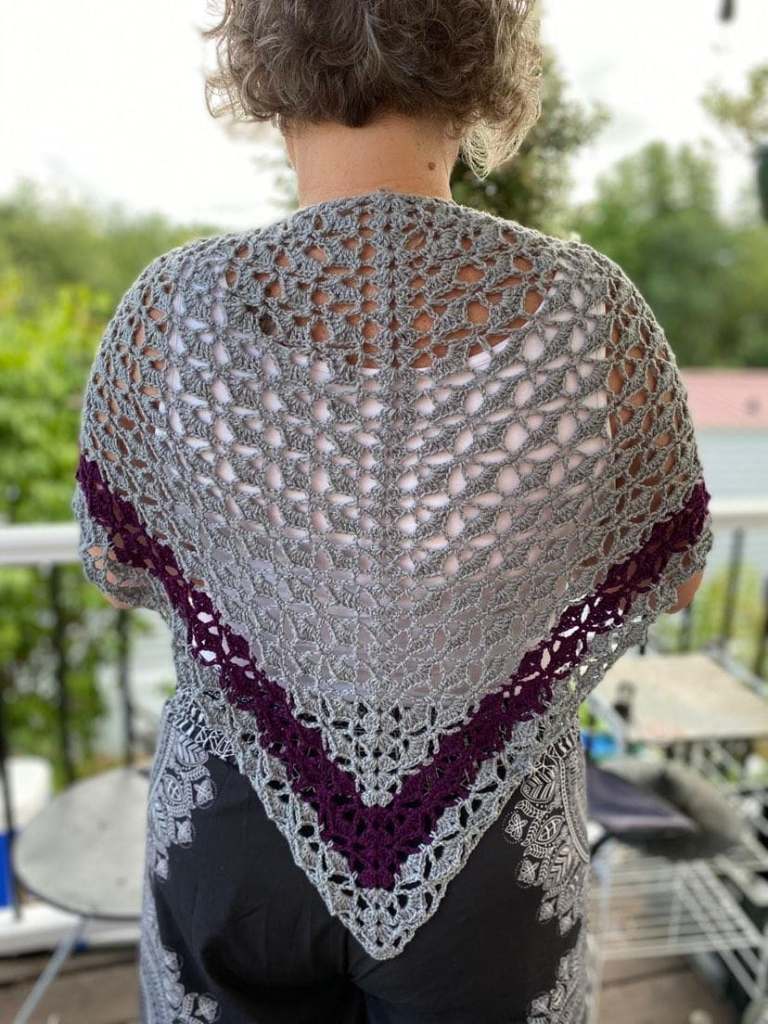
For today’s free pattern, I teamed up with my friends at Clover-USA to bring you this beautiful lacy shawl! This elegant shawl is a perfect addition to your summer to fall/winter wardrobe! Since it is still summer, I decided to use the hand-dyed gradient cotton yarn from Dreamers Yarn, but of course, you can definitely use any yarn fibers you want. I want to mention that since the gauge for this pattern is not that important, you may also use any yarn weight/category you want. When you opt for different yarn weights, please adjust your crochet hook or use the recommended hook size on the yarn label. With the coming colder seasons, I am sure that it is much better to use warmer fibers and/or thicker yarn weights. So, with these being said, the choice is definitely yours!
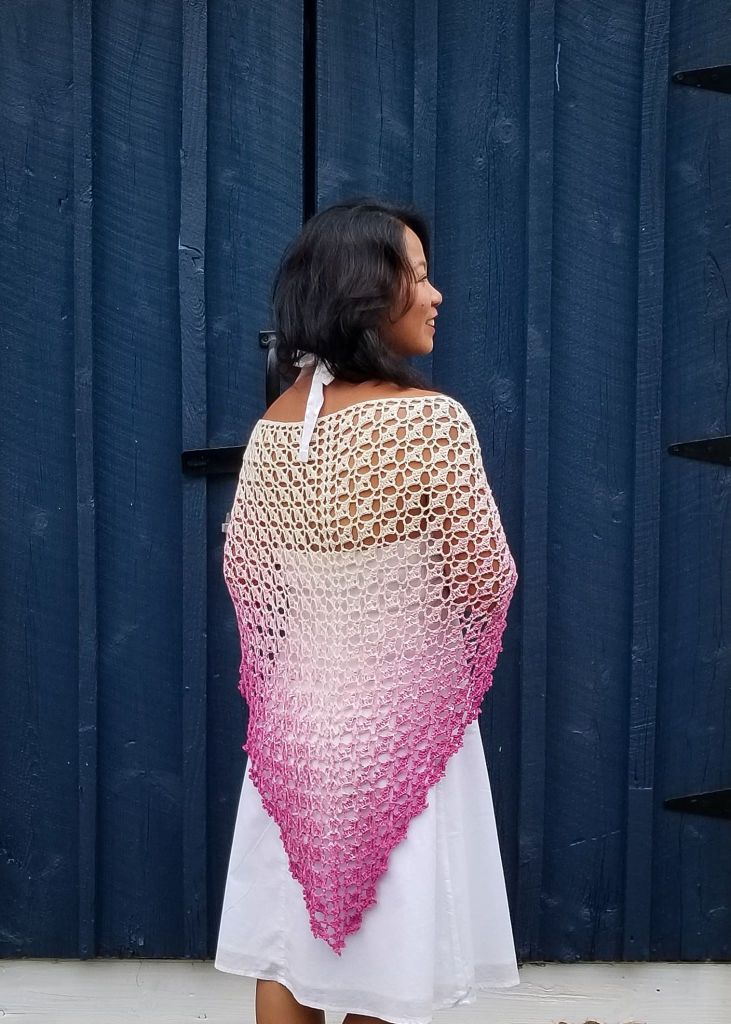
This lacy triangle shawl is fun to make and it works up pretty fast! I used my all time favorite hook – the Clover Amour Crochet Hook in making my shawl! The Clover Amour Hooks are my go-to hooks and they never disappoint me when crocheting!
This pattern is pretty much an adventurous beginner project! All you need to know to make this shawl are the basic crochet stitches like the chain, single crochet, and double crochet plus the picot stitches. I included a YouTube tutorial for the picot stitch so you can watch and learn before you begin with this project.

Once the pattern is established, you only need to repeat 2 rows until you get to your desired shawl measurement! How easy is that? You also have the option to add the simple edging or border! But, if I were you, I will absolutely finish it with the one row edging! This gives the finishing touches to the shawl!
Are you ready to get start?
Here we go!
RASPBERRY SPLASH SHAWL
This pattern is FREE but you can also purchase the inexpensive PDF file on my Ravelry shop for easy printing and reading. Purchasing the PDF file helps to support my blog and allows me to continue to share my patterns with you.
SKILL LEVEL: Advanced Beginner
MATERIALS
- Fingering Weight Yarn | 800+ yards (depending on how big you want your shawl to be)
- Crochet Hook Size G | 4 mm
- Scissors
- Stitch Marker
- Tapestry Needle
GAUGE: Work Rows 1 to 8 in the pattern
~ 2 ways to measure:
- Sideways (width) – from the middle, Row 1 to 7 = 4 inches
- Mid-point (height) – Row 1 to 8 = 4 inches
FINISHED MEASUREMENTS: Approximately 60” width x 30” height
STITCHES AND ABBREVIATIONS | US TERMINOLOGY
- Ch(s) – Chain(s)
- DC – Double Crochet
- PM – Place Marker
- Prev – Previous
- Rep – Repeat
- SC –Single Crochet
- St(s) – Stitch(es)
- Sp(s) – Space(s)
- P – Picot Stitch – this stitch is made on top of another stitch. To begin ch 3 then slip stitch in the two front loops of the previously made stitch. (See Notes for the video link tutorial)
NOTES
- Read the pattern carefully before starting.
- All measurements given are unblocked.
- Placing a st marker in the center-sp is helpful. With the st marker you could easily locate the center-sp.
- Asterisk * indicates pattern repeats. You will need to repeat all the instructions between asterisks.
- Parentheses ( ) are used to indicate a group of stitches to be worked in the same st/sp.
- This pattern can be easily customized to the size you like, how big or wide it may be. Also, you can use different yarn weight but when you do, adjust also the crochet hook size according to the size in the yarn label.
- How to crochet the Picot Stitch, watch here.
PATTERN INSTRUCTIONS
Begin with a magic ring or ch 5 and sl st in the 1st ch to form a ring.
Row 1: Ch 3, 2 DC in to the ring, ch 3, 3 DC in to the ring. Turn. PM in the center sp and move it up every row.
Row 2: Ch 3, 2 DC in the 1st st, ch 3, (3 DC, ch 3, 3 DC) in the center-sp, Ch 3, 3 DC in the last st. Turn.
Row 3: Ch 3, 2 DC in the 1st st, ch 3, (DC, ch 3, DC) in the ch-3-sp, ch 3, (3 DC, ch 3, 3 DC) in the center-sp, ch 3, (DC, ch 3, DC) in the ch-3-sp, ch 3, 3 DC in the last st. Turn.
Row 4: Ch 3, 2 DC in the 1st st, ch 3, SC in the ch-3-sp, (3 DC, ch 2, 3 DC) in the next ch-3-sp, SC in the next ch-3-sp, ch 3, (3 DC, ch 3, 3 DC) in the center-sp, ch 3, SC in the next ch-3-sp, (3 DC, ch 2, 3 DC) in the next ch-3-sp, SC in the next ch-3-sp, ch 3, 3 DC in the last st. Turn.
Row 5: Ch 3, 2 DC in the 1st st, ch 3, (DC, ch 3, DC) in the ch-3-sp, ch 3, DC in the ch-2-sp, ch 3, (DC, ch 3, DC) in the ch-3-sp, ch 3, (3 DC, ch 3, 3 DC) in the center-sp, ch 3, (DC, ch 3, DC) in the ch-3-sp, ch 3, DC in the ch-2-sp, ch 3, (DC, ch 3, DC) in the ch-3-sp, ch 3, 3 DC in the last st. Turn.
Row 6: Ch 3, 2 DC in the 1st st, ch 3, *SC in the ch-3-sp, (3 DC, ch 2, 3 DC) in the next ch-3-sp, SC in the next ch-3-sp, ch 3*; Rep from * to * to the center-sp, (3 DC, ch 3, 3 DC) in the center-sp, ch 3; Rep from * to * to the last st, 3 DC in the last st. Turn.
Row 7: Ch 3, 2 DC in the 1st st, ch 3, *(DC, ch 3, DC) in the next ch-3-sp, ch 3, DC in the ch-2-sp, ch 3*; Rep from * to * to the last ch-3-sp before the center-sp, (DC, ch 3, DC) in the next ch-3-sp, ch 3, (3 DC, ch 3, 3 DC) in the center-sp, ch 3; Rep from * to * to the last ch-3-sp, (DC, ch 3, DC) in the next ch-3-sp, ch 3, 3 DC in the last st. Turn.
Rep Row 6 and 7 until you get your desired shawl size.
^ For NO Edging option: You should end with Row 6. Fasten off and weave in ends.
Optional: You may attach a tassel in each corner of your shawl.
EDGING
This part of the pattern works up like Row 6, we only need to add some picot stitches to define the border. So, end your shawl with Row 7 and then continue with Row 8 for the edging.
Row 8: Ch 3, (DC, P, DC) in the 1st st, ch 3, *SC in the ch-3-sp, P, (2 DC, P, DC, ch 5, sl st in the 3rd ch from the hook, ch 1, 2 DC, P, DC) in the next ch-3-sp, SC in the next ch-3-sp, ch 3*; Rep from * to * to the center-sp, (2 DC, P, DC, ch 7, sl st in the 5th ch from the hook, ch 1, 2 DC, P, DC) in the center-sp, ch 3; Rep from * to * to the last st, (2 DC, P, DC) in the last st.
Fasten off and weave in ends.
Block your shawl and it’s all done!
Enjoy your new shawl!
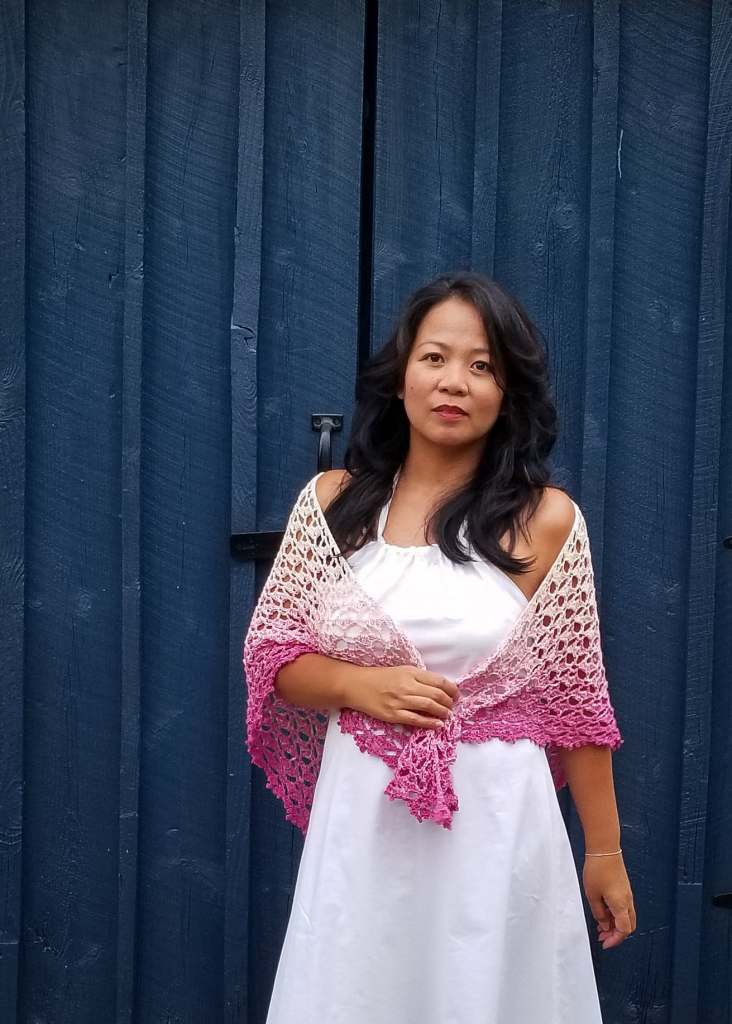
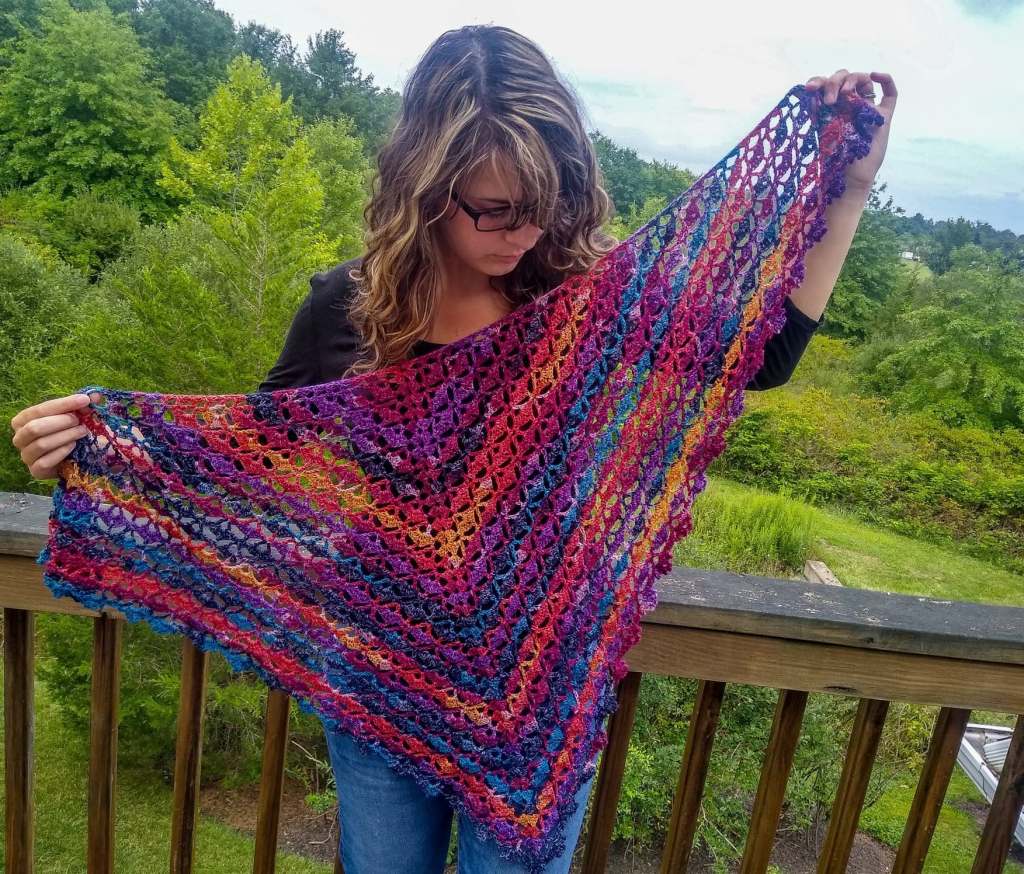
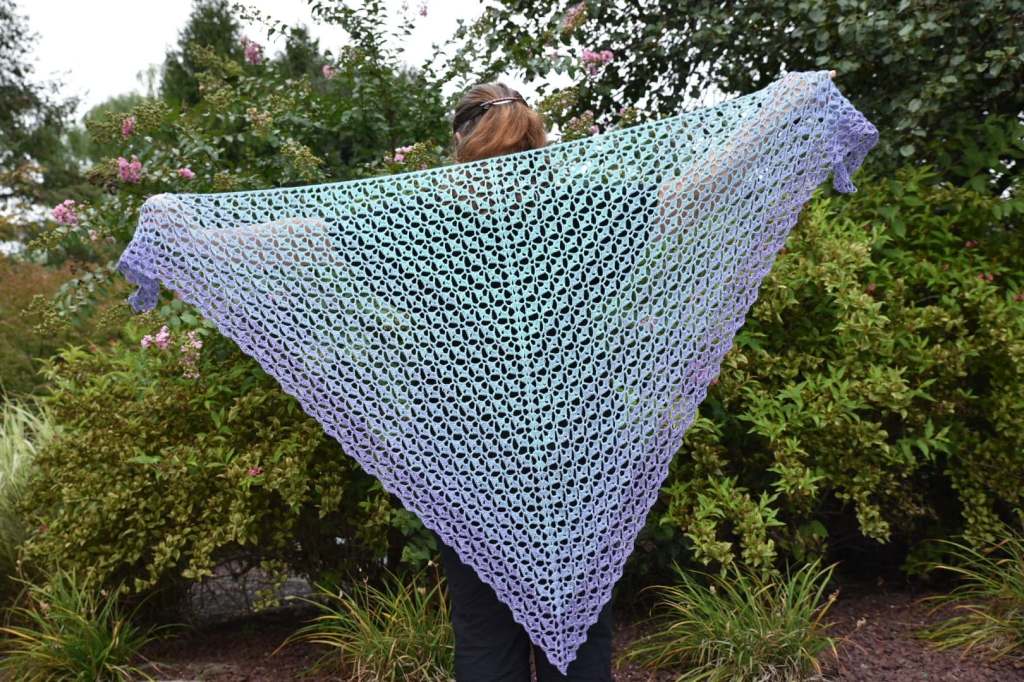
Would you love to see my tester’s versions?
Here they are!
Now, I’d love to see yours! Please tag me @stringsandcuddles on Instagram so I can see and share your project.
***
All images and patterns are the copyrighted property of STRINGS AND CUDDLES. You may sell any items that you make from this pattern. You may NOT use my images. Please DO NOT copy, redistribute or claim as your own. If selling items from this pattern, please give credit to STRINGS AND CUDDLES by linking to my shops or on social media @stringsandcuddles.
I would love to see what you create! Please use these hashtags to share: #stringsandcuddles, #stringsandcuddlesdesigns, #raspberrysplashshawl
Please don’t hesitate to reach out for questions regarding this pattern.
Connect with me on Instagram | Pinterest | Facebook | Blog | Ravelry

This is beautiful!!
LikeLiked by 1 person