Oh summer, why so hot? Hahaha!!!
How do you like the heat that summer is bringing us this year? I don’t know with you, but I am so ready for fall! No more 90+ degrees Fahrenheit please!
Before summer goes away, let me share with you this new sun hat that I designed! Inspiration? of course the heat! Having a great head covering while walking outside around your yard or to the beach or park is very much needed.
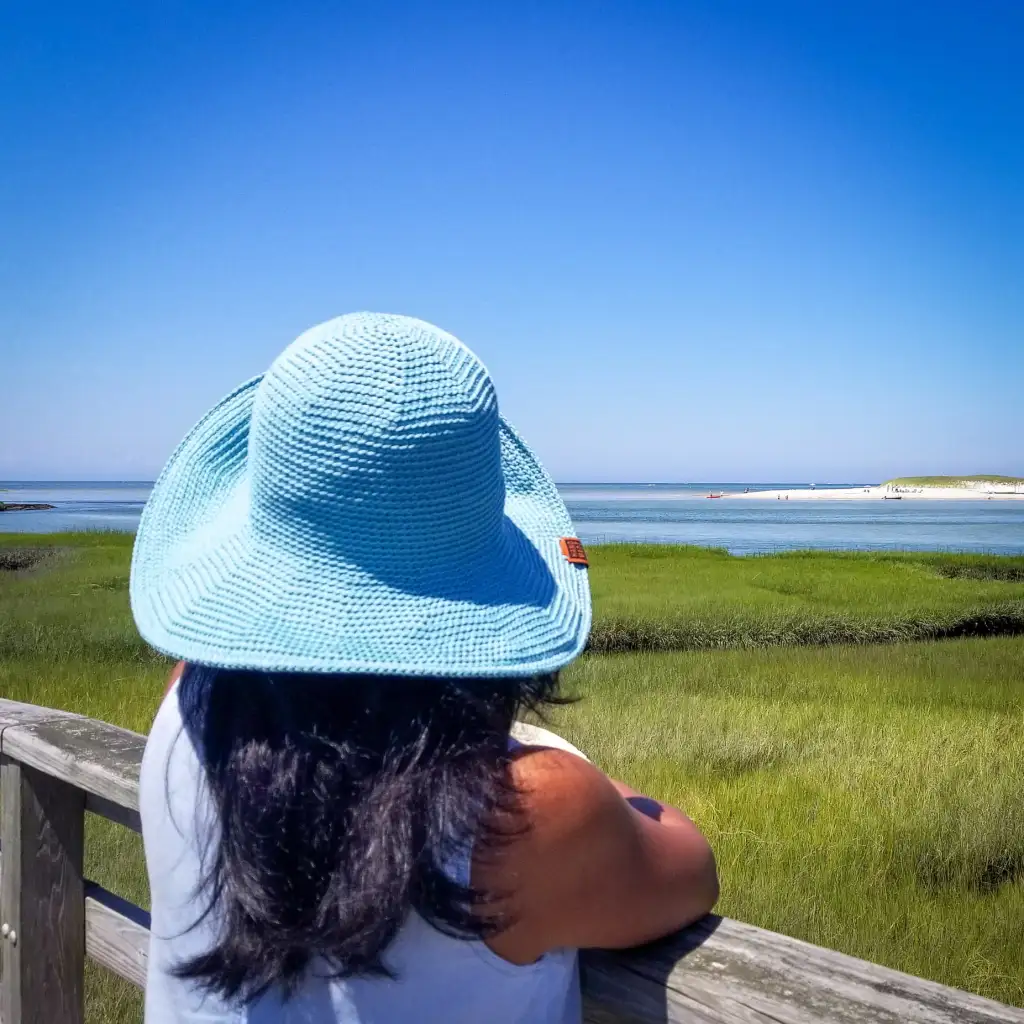
A hat with a wide flexible or floppy brim is just the perfect addition to your outfit of the day! Not only that it protects you from the blazing heat of the sun, it’s also a great statement to your outfit!
Since it’s summer, I went for Lion Brand 24/7 Cotton yarn in making my sun hat. I love this yarn so much. I used it in making The Cerulean Purse and Spring Sprig Bag. I also made a top with this yarn. Going back to the my hat design, I created it to kind of mimic those raffia sun hats that we see in the stores. I already had a stitch pattern I wanted to use for this project and when I tried it, I was amazed with how it turned out!
Another fun thing about this pattern is the added brim wire. This wire makes the difference. I love the flexibility of the brim with the added wire. I discovered this brim wire through a good friend. She gave me a couple coil, but I just kept them and never used until I decided to make the My Favorite Sun Hat. I tell you, you will want to try it out!
By the way, if you don’t have any access to plastic brim wire, you can also use beading wire with a 21 or 22 gauge. For a much sturdier brim, you may use 2 strands of beading wire.
Now without any more delay, let’s get started!

THE EVERYDAY SUMMER HAT
~ WORSTED WEIGHT VERSION ~
This pattern is FREE but you can also purchase the inexpensive PDF file on my Ravelry shop for easy printing and reading. Purchasing the PDF file helps to support my blog and allows me to continue to share my patterns with you.
FAVORITE OR BUY IT ON RAVELRY SHOP
SKILL LEVEL: Advanced Beginner
MATERIALS
- Worsted Weight Yarn (#4) | Lion Brand 24/7 Cotton | 2 Skeins
- Hook Size H | 5 mm (or size to obtain gauge)
- Scissors
- Stitch Marker
- Tape Measure
- Tapestry Needle
- Plastic Hat Brim Wire also known as Millinery Wire | Approximately 50 inches
- Brim Wire Joiner or a strong adhesive tape
GAUGE: 19 sts x 16 rounds = 4 inches (in cross stitch single crochet BLO)
HOW TO SWATCH GAUGE IN THE ROUND
You can start by chaining 50 (or at least 3x the number of stitches the gauge of the pattern calls for), being careful not to twist your chains, work your first stitch (CSSC) in the back loop of the very first chain and in every ch around. Continue working until you have at least 18 rounds (or the number of rounds the gauge of the pattern calls for). Lay your work flat and then measure it. Refer to the photos below.


FINISHED MEASUREMENT: Fits a Teen/Small Adult to Medium Adult with 21 -23 inches Head Circumference
STITCHES AND ABBREVIATIONS | US Terminology
- Ch(s) – Chain(s)
- BLO – Back Loop Only
- MR – Magic Ring
- Rep – Repeat
- PM – Place Marker
- Sl St(s) – Slip Stitch(es)
- CSSC – Cross Stitch Single Crochet – insert hook in the indicated st, yarn under, pull up a loop, yarn over, pull through 2 loops.
NOTES
- Read the pattern carefully before starting.
- This pattern is worked in the round, from the top down. Do not join rounds unless otherwise stated. Use a stitch marker to mark the beginning of the round and move as work progresses.
- The entirety of this pattern is worked in the BLO except for the last 2 rows where you attach the brim wire.
- Asterisks * * indicate repeat instructions between asterisks as many times as directed or repeat at specified locations.
- If you’re not familiar with these stitches/techniques, please click on the highlighted words to watch the videos:

PATTERN INSTRUCTIONS
CROWN OF THE HAT
Round 1: With a MR, ch 1, work 8 CSSC into the ring. Pull tight the yarn tail to close the round. – 8 sts
Remember to PM in the beginning of each round and move it as work progresses. You’ll be working in the BLO up to the row where you attach the brim wire.
Round 2: 2 CSSC in each st around. – 16 sts
Round 3: *2 CSSC in the next st, 1 CSSC in the next sts*; Repeat from * to * around. – 24 sts
Round 4: *2 CSSC in the next st, 1 CSSC in the 2 next sts*; Repeat from * to * around. – 32 sts
Round 5: *2 CSSC in the next st, 1 CSSC in the 3 next sts*; Repeat from * to * around. – 40 sts
Round 6: *2 CSSC in the next st, 1 CSSC in the 4 next sts*; Repeat from * to * around. – 48 sts
Round 7: *2 CSSC in the next st, 1 CSSC in the 5 next sts*; Repeat from * to * around. – 56 sts
Round 8: *2 CSSC in the next st, 1 CSSC in the 6 next sts*; Repeat from * to * around. – 64 sts
Round 9: *2 CSSC in the next st, 1 CSSC in the 7 next sts*; Repeat from * to * around. – 72 sts
Round 10: *2 CSSC in the next st, 1 CSSC in the 8 next sts*; Repeat from * to * around. – 80 sts
Round 11: *2 CSSC in the next st, 1 CSSC in the 9 nex t sts*; Repeat from * to * around. – 88 sts
Round 12: *2 CSSC in the next st, 1 CSSC in the 10 next sts*; Repeat from * to * around. – 96 sts
At this point, your Crown should measure approximately 7 inches in diameter.
BODY OF THE HAT
Round 13: 1 CSSC in each st around. – 96 sts
Rep Round 13 for 19 more times or until your hat measures approximately 7 inches from the top.

BRIM OF THE HAT
Round 14: *2 CSSC in the next st, 1 CSSC in the 11 next sts*; Repeat from * to * around. – 104 sts
Round 15: 1 CSSC in the next 6 sts, 2 CSSC in the next st, *1 CSSC in the next 12 sts, 2 CSSC in the next st*; Repeat from * to * up to 6 sts remaining, 1 CSSC in the last 6 sts. – 112 sts
Round 16: *2 CSSC in the next st, 1 CSSC in the 13 next sts*; Repeat from * to * around. – 120 sts
Round 17: 1 CSSC in the next 7 sts, 2 CSSC in the next st, *1 CSSC in the next 14 sts, 2 CSSC in the next st*; Repeat from * to * up to 7 sts remaining, 1 CSSC in the last 7 sts. – 128 sts
Round 18: *2 CSSC in the next st, 1 CSSC in the 15 next sts*; Repeat from * to * around. – 136 sts
Round 19: 1 CSSC in the next 8 sts, 2 CSSC in the next st, *1 CSSC in the next 16 sts, 2 CSSC in the next st*; Repeat from * to * up to 8 sts remaining, 1 CSSC in the last 8 sts. – 144 sts
Round 20: *2 CSSC in the next st, 1 CSSC in the 17 next sts*; Repeat from * to * around. – 152 sts
Round 21: 1 CSSC in the next 9 sts, 2 CSSC in the next st, *1 CSSC in the next 18 sts, 2 CSSC in the next st*; Repeat from * to * up to 9 sts remaining, 1 CSSC in the last 9 sts. – 160 sts
Round 22: *2 CSSC in the next st, 1 CSSC in the 19 next sts*; Repeat from * to * around. – 168 sts
Round 23: 1 CSSC in the next 10 sts, 2 CSSC in the next st, *1 CSSC in the next 20 sts, 2 CSSC in the next st*; Repeat from * to * up to 10 sts remaining, 1 CSSC in the last 10 sts. – 176 sts
Round 24: *2 CSSC in the next st, 1 CSSC in the 21 next sts*; Repeat from * to * around. – 184 sts
Round 25: 1 CSSC in the next 11 sts, 2 CSSC in the next st, *1 CSSC in the next 22 sts, 2 CSSC in the next st*; Repeat from * to * up to 11 sts remaining, 1 CSSC in the last 11 sts. – 192 sts
Round 26: *2 CSSC in the next st, 1 CSSC in the 23 next sts*; Repeat from * to * around. – 200 sts
Round 27: 1 CSSC in the next 12 sts, 2 CSSC in the next st, *1 CSSC in the next 24 sts, 2 CSSC in the next st*; Repeat from * to * up to 12 sts remaining, 1 CSSC in the last 12 sts. – 208 sts
Round 28: *2 CSSC in the next st, 1 CSSC in the 25 next sts*; Repeat from * to * around. – 216 sts
Prepare your brim wire, you’ll be attaching it into the next round. You will crochet over it, please see the photos on page 6 how to attach the brim wire for your reference.
Round 29: working in both loops, 1 CSSC in each st around. – 216 sts
Remember to join the wire before completely finishing Round 29 (refer to the photos below).


Round 30: working in both loops, 1 sl st in each st around. – 216 sts
Sl st in the 1st st. Fasten off, weave in all ends and you’re done!!!
Now let us take a closer look at the finished projects from my awesome testers!


Now, I am excited to see your version!
Oh before you go, I am in the making of the BULKY WEIGHT Version of this sun hat pattern! So you better stay tuned!
Happy crocheting!
***
All images and patterns are the copyrighted property of STRINGS AND CUDDLES. You may sell any items that you make from this pattern. You may NOT use my images. Please DO NOT copy, redistribute or claim as your own. If selling items from this pattern, please give credit to STRINGS AND CUDDLES by linking to my shops or on social media @stringsandcuddles.
I would love to see what you create! Please use these hashtags to share:
#stringsandcuddles, #stringsandcuddlesdesigns, #theeverydaysummerhat
Please don’t hesitate to reach out for questions regarding this pattern.
Connect with me Instagram | Pinterest | Facebook | Blog | Ravelry
***

This looks so good on you. You picked the perfect blue.
LikeLiked by 1 person